Color block positioning
The main purpose of color block positioning is to further achieve color block tracking.
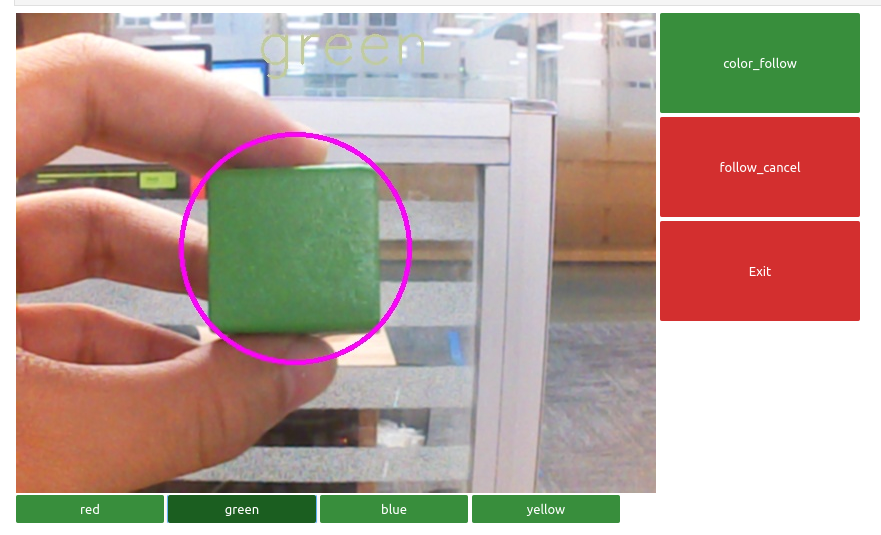
Its working principle is to determine the distance and position information of the color block based on the camera, and to determine the position of the color block by calculating the center point coordinates of the color block in the camera image, thereby achieving color block positioning.
The experimental phenomenon is that we can see the center point of the color block in the camera image, which will always follow the movement of the color block.
1. About code
Code path:~/jetcobot_ws/src/jetcobot_color_follow/color_positioning.ipynb
- Import header file
import cv2 as cv
import threading
import random
from time import sleep
import ipywidgets as widgets
from IPython.display import display
from positioning import color_follow
- The main recognition function is to simultaneously obtain the target center point of the color block(color_x, color_y)
def follow_function(self, img, HSV_config):
(color_lower, color_upper) = HSV_config
self.img = cv.resize(img, (640, 480), )
self.img = cv.GaussianBlur(self.img, (5, 5), 0)
hsv = cv.cvtColor(self.img, cv.COLOR_BGR2HSV)
mask = cv.inRange(hsv, color_lower, color_upper)
mask = cv.erode(mask, None, iterations=2)
mask = cv.dilate(mask, None, iterations=2)
mask = cv.GaussianBlur(mask, (5, 5), 0)
cnts = cv.findContours(mask.copy(), cv.RETR_EXTERNAL, cv.CHAIN_APPROX_SIMPLE)[-2]

if len(cnts) > 0:
cnt = max(cnts, key=cv.contourArea)
(color_x, color_y), color_radius = cv.minEnclosingCircle(cnt)

if color_radius > 10:
# Mark the detected color with the prototype coil
# Mark the detected color with a circle
cv.circle(self.img, (int(color_x), int(color_y)), int(color_radius), (255, 0, 255), 3)
print(color_x,color_y)
return self.img
- Create Control
button_layout = widgets.Layout(width='200px', height='100px', align_self='center')
# Output widget
output = widgets.Output()
# Color tracking
color_follow = widgets.Button(description='color_follow', button_style='success', layout=button_layout)
# Select color
choose_color = widgets.ToggleButtons(options=['red', 'green', 'blue', 'yellow'], button_style='success',
tooltips=['Description of slow', 'Description of regular', 'Description of fast'])
# Cancel tracking
follow_cancel = widgets.Button(description='follow_cancel', button_style='danger', layout=button_layout)

# exit
exit_button = widgets.Button(description='Exit', button_style='danger', layout=button_layout)
# Image widget
imgbox = widgets.Image(format='jpg', height=480, width=640, layout=widgets.Layout(align_self='auto'))
# Vertical layout
img_box = widgets.VBox([imgbox, choose_color], layout=widgets.Layout(align_self='auto'))
# Vertical layout
Slider_box = widgets.VBox([color_follow,follow_cancel,exit_button],
layout=widgets.Layout(align_self='auto'))
# Horizontal layout
controls_box = widgets.HBox([img_box, Slider_box], layout=widgets.Layout(align_self='auto'))
# ['auto', 'flex-start', 'flex-end', 'center', 'baseline', 'stretch', 'inherit', 'initial', 'unset']
Main process
def camera():

global HSV_learning,model
# Open camera
capture = cv.VideoCapture(0)
capture.set(3, 640)
capture.set(4, 480)
capture.set(5, 30)
# Be executed in loop when the camera is opened normally
#  # translated to English (best-effort)
while capture.isOpened():
try:
_, img = capture.read()
img = cv.resize(img, (640, 480))

if model == 'color_follow':
img = follow.follow_function(img, color_hsv[choose_color.value])
cv.putText(img, choose_color.value, (int(img.shape[0] / 2), 50), cv.FONT_HERSHEY_SIMPLEX, 2, color[random.randint(0, 254)], 2)

if model == 'learning_color':
img,HSV_learning = follow.get_hsv(img)

if model == 'Exit':
cv.destroyAllWindows()
capture.release()
break
imgbox.value = cv.imencode('.jpg', img)[1].tobytes()
except KeyboardInterrupt:capture.release()
2. Run program
Click the run button on the jupyterlab toolbar, run the entire program, and then drag it to the bottom.
![]()
We can see the image captured by the camera, click on 【 color_follow 】, and you can see that the color blocks will be boxed